Monday, January 21, 2019

Clifford and Moby


Traci and I made it back from Florida with our new (used) trailer. It looks gigantic compared to the black trailer. It is the same length but is 13 feet tall. and has tons of space. It is an older trailer but is built five times better than our original trailer. It is made out of all aluminum so it is actually lighter than the black trailer.

The living quarters are well laid out but considerably smaller that the black trailer. This gives us way more room in the car garage area. We have room for both the dragster (on the bottom), The Black Hole (on the lift), and the Honda UTV (in the upper loft over the work area).

The shop area and car storage is awesome! The outside is very straight but is faded somewhat so We will figure out how we want to jazz that up.

Clifford the Big Red Truck did an excellent job of pulling the trailer. We pulled it all the way (2200 mile round trip) about 65 mph and averaged 9.3 mpg even with  30-40 mph head wind the entire way back. We did about 3.5 days of driving.

Traci even got to get a bottle of sand on the beach at Cocoa Beach, Florida while we were there. We sure miss the beautiful weather we had in Florida. It was 75 and beautiful!

Now I bet you are wondering about the name? Clifford's name came form a children's books series about a giant red dog and you guessed it, Moby came from the classic book Moby Dick, about a big white whale!!!


Click on the Blog Archive hierarchy on the right hand side to see my posts in order. The ones at the bottom are the newest posts.


Or


Back to Home Page


Saturday, January 12, 2019

It is Alive!!!

I have been working on the electrical and data system for several days now. Mike Janis supplied me with an awesome data collection system by Racepak.  It is one of their high end units that links to your PC by Bluetooth so cables and memory stick file transfer is not necessary.

I decided to take it to the next level and purchased one of Racepak's digital electronic control systems called "Smartwire" It is basically a Programmable Logic Controller  (PLC) for race cars. It eliminates having to have relays and other electrical switching devices. It also allows you to program conditional switching parameters to make functions happen. For instance, you can program a function to require multiple conditions to be met before the circuit will energize. A function may be programmed to require that a manual switch be activated as well as some other condition (engine rpm, oil pressure, fuel pressure, etc.)

The system is also fully integrated into the Racepak data gathering system so all events can be recorded and viewed with all of the other data. I will be running all of my electrical events through this system so I can verify that each event happens when it is supposed to. This includes the shifting of the transmission. This is possible because the system allows external triggers to pass through the PLC and be used as a part of the switching logic. I will be taking a sign from The MSD ignition system shifting function and passing it through the Smartwire system to actually perform the shift.

I powered everything up yesterday and started programming all of the functions today and it is really cool. There are a million things you can program into the system.

Here are some screen shots showing how you log data and build functionality logic.

This is the main Racepak page showing all of the channels being monitored and all of the devices that are present in the system. As you can see, there are a lot of things going on in this car!!!


This screen is where you program the digital dash to display the key data that you need to see when you are making a run.


On this page, I have set up a circuit to perform the 1st to 2nd gear shift. I will create multiple conditions for this shift to occur.


This page is where you build the switching logic. Here I have built two methods of making the shift occur. The first method is to take a signal from the MSD ignition system where I have set up my specific conditions to make an automatic shift.

The second method uses the manual shift buttons in the cockpit. These manual buttons will be used during the burnout when the ignition system shift commands are not enabled.


This page is where I set up the lights and brake lights when I am running the Midwest ProMod series. That series runs mostly at night and tail lights are required. Here I am setting up the brake lights (which operate when the brake lines have pressure on them) to only work when I have manually switched on the lighting circuit.


In this screen I have applied the two conditions that make the lights function the way I want them too.


Here are a couple of pictures of all of the wires forming the central nervous system of the car. It was all a mess here but now it is all cleaned up and organized. I will get some final pictures when I get everything done.

It was pretty awesome when I powered everything up for the first time. When the central nervous system came to life, "It is Alive"


Sunday, January 6, 2019

Slow Progress but Big Move in the Right Direction

So this weekend was a little slow on progress but some major steps forward were made. Some of you may not have known but the trailer that we own was bought when I thought the dream was to drag race a boat (read the story on the blog if you don't know it). The trailer is nice with a really big living quarters but the shop area is very small (Perfect for a little Drag Boat). We have barely been able to use it for the dragster and I had to build a mechanism to lift and store the nose of the dragster up in the air to get a pit vehicle in the trailer.

I have tried every way I can to figure out how to get the ProMod, the pit vehicle, and all the spares/tools I need in the trailer. What I have found is that there is no practical way to do that. Traci and I have been looking for a solution for months but most of the good solutions required the purchase of a toter home with living quarters, which was very expensive! A few days ago, a trailer appeared  on my favorite race site and it was perfect. It is the same length as our current trailer but is 2 feet taller and has an upper and lower level to store cars and spares (called a stacker trailer). The trailer has a hydraulic lift to raise a car or pit vehicle to make room for another car on the bottom. The living quarters in it are not quite as large as our current one but we really don't use all of the space anyway.

As usual, it is located as far away as possible and we have to find time to make another quick trip to Florida to pick it up before the test session in February. Naturally, it is on the Atlantic side of Florida and is in the lower par of the state.We will have to figure out how we can leave with Dad still needing assistance.

This is a really small and bad picture of the trailer. The other pictures are kind of bad too because the owner has junk everywhere in the trailer. It is an all aluminum trailer which makes it very light (for a big trailer) and durable. It also has a 53 foot awning so we can do all of our between round maintenance in the shade and without getting wet during showers (it rains every time we race).

We will sell our existing trailer once we get the new one ready to go.

The truck does not come with the trailer. We will use Clifford the Big Red Truck to pull it
Gold rush stacker   for Sale $68,000
Looking Towards the Tailgate
Gold rush stacker   for Sale $68,000
Upper Deck to Store Pit Vehicle
Gold rush stacker   for Sale $68,000
Lots of Cabinets
Gold rush stacker   for Sale $68,000
Car Lift Pouches
Gold rush stacker   for Sale $68,000
Cabinets on Opposite Side
Gold rush stacker   for Sale $68,000
Outside the Shop
Gold rush stacker   for Sale $68,000
Bedroom
Gold rush stacker   for Sale $68,000
Kitchen
I also made some progress on the car and found out that my fuel system parts are on their way. As usual, Mike Janis got me some really awesome fuel system control valves and controller. I can't wait to get it all and start installing it.

I also got all of the carbon fiber tube protectors installed and a bunch of wiring stuff done. The carbon tube protectors are needed because paint would get chipped off during between round maintenance and expose the steel chassis. The wires that are laying around will be cleaned u when I am done with the electrical system.

I also got the helmet restraint padding mounted to the roll cage. This padding limits how far your head could move in a violent crash (which I plan on never using).


Click on the Blog Archive hierarchy on the right hand side to see my posts in order. The ones at the bottom are the newest posts.


Or


Back to Home Page


Wednesday, January 2, 2019

Last Update for 2018


Well, 2018 is done and it was a year full of blessings! Most of all, Dad survived another close call and is getting better every day. He is one of the toughest old guys I have ever met. Surviving a broken Femur at 87 years old is not easy. He is doing most things for himself and tomorrow we will leave him at home for the first time since he fell. My brother is going to come by and make sure he is OK and have lunch with him.

We are going back to work tomorrow and I must say that it has been a long time since I enjoyed myself as much as I have working uninterrupted on the "Black Hole" I realized this morning that I have not had a single stress headache since I left the office the second week of December. I usually have at least two a week!!! If it doesn't do anything else for me, the car has added some stress relief into my life.

I am so thankful to God and to Traci for giving me the ability to drag race and build this awesome car. It is a great sport and I have met so many good people doing it. I am also thankful to all of you (friends and family) who follow this blog and give me support.

I have also met some really good suppliers of goods and services for the drag racing world.

I cannot say enough about how much support Mike Janis Jr. and Mike Janis Sr. have given me. They have helped me believe that I can do this and they have led me in the right direction all along the way. They have also become good friends of mine. They are truly good people!

There is also Scott at Tim McAmis Race Cars. I don't think I have ever had service equal to what Scott and Tim McAmis has given me. They always get my orders out the same day that I place them. Tim also produces a full suite of videos that have helped me to learn a lot about building a ProMod drag car. His videos are informative and funny.

Rick Jones (Quartermax) has also been very good to supply parts quickly.

Last I would like to thank Jerry and Andrea Clements for all of the prayers and support you give us to help us make it through the tough times as well as the good times.

I had a total of 53 updates to the blog this year and have posted hundreds of pictures. I hope you all have enjoyed watching my dream come true. I have really grown to love doing these updates. I never would have dreamed of taking all of the pictures and documenting this in my earlier life. I only started doing it because Clay Coleman (family friend) challenged me to document the work I do so a younger generation could learn how an old mechanic spends his spare time. Thanks Clay for challenging me.

I also use this blog to talk about how all things are possible through Jesus Christ. I am living proof of that. Look at what HE has done for me. God is Awesome!

Now, let me tell you about the last of the progress for 2018. I was hoping to start the big Hemi for the first time before 2018 ended but didn't quite make that goal.  I still believe my progress has gone very well. I also still believe it is possible to test run the car some time in February.

Since the last update, I have accomplished the following:

1. All of the carbon fiber work is done except the wheel wells (called tubs). I cannot do them until I permanently mount the body. I just finished making a complicated carbon fiber piece to seal the drive shaft safety tube to the back of the chassis this morning.


2. The seat and seat belts are one. I have strapped myself in a couple of times to test the fit and make a few "VROOOM, VROOOM" sounds while i am in there.


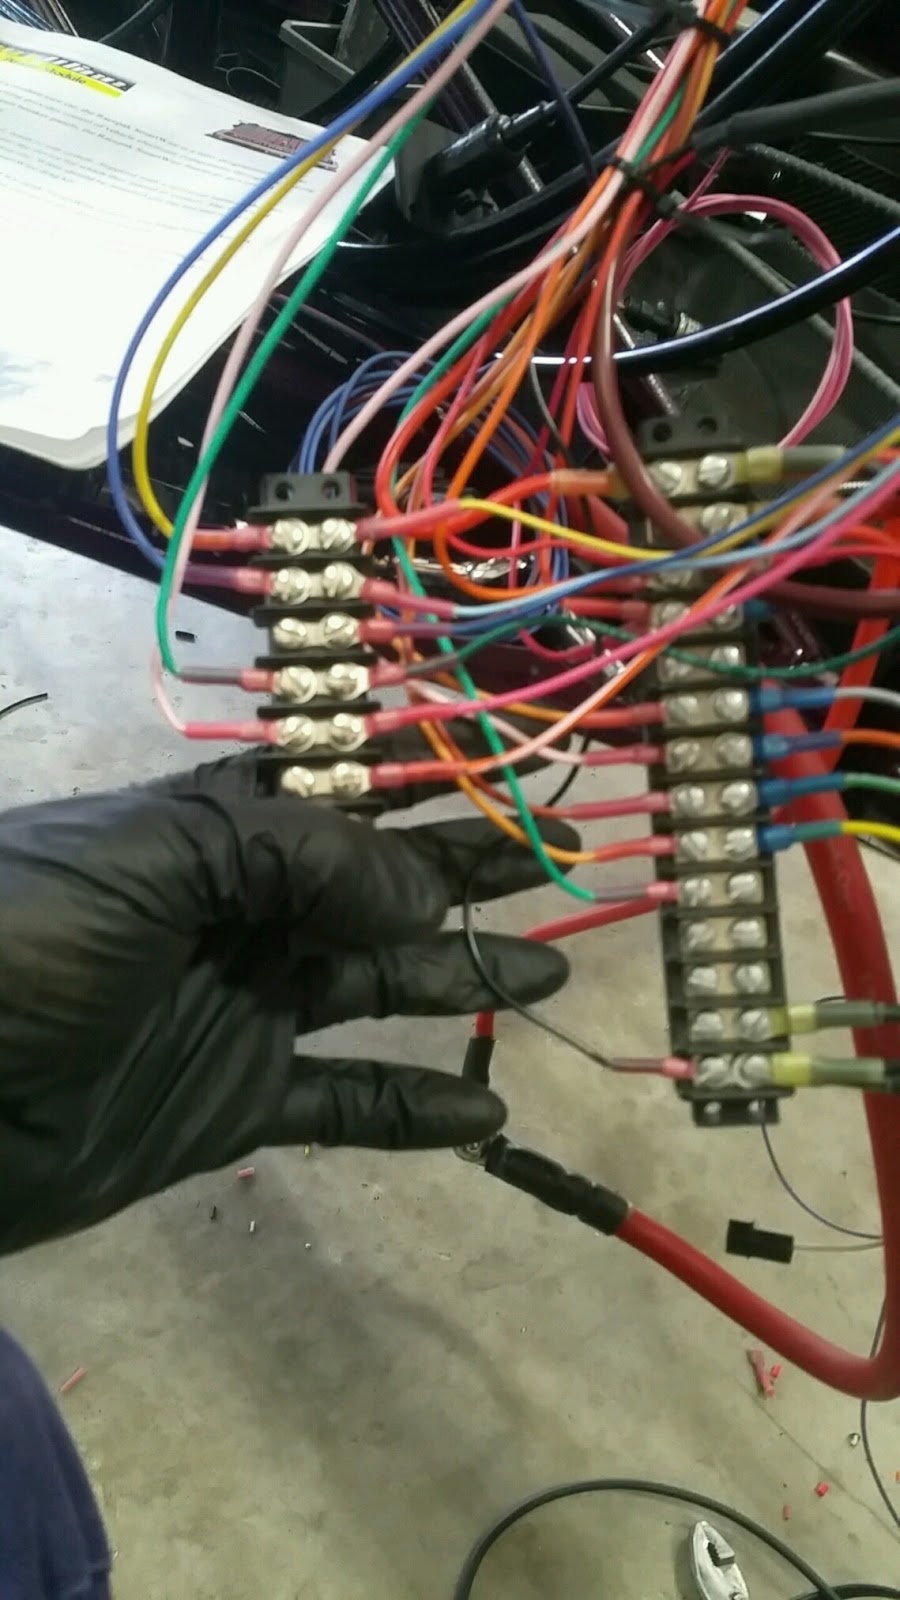
2. All of the control cables, electrical cables, air hoses, etc. have been routed and are waiting to be terminated.


4. The crankcase ventilation system is installed and hooked up.


5. The foot controls are installed and hooked up.


6. The shift controls are installed. These big red knobs are for manual shifting during the burnout or when manual shifting is desired.


7. The parachute handles and cables are installed.

8. The driveshaft safety loops and tube are installed.


There is probably a bunch of other stuff done that I have forgot but I will get those later.

Thanks again to everyone who supports my dream!


Click on the Blog Archive hierarchy on the right hand side to see my posts in order. The ones at the bottom are the newest posts.


Or

Back to Home Page